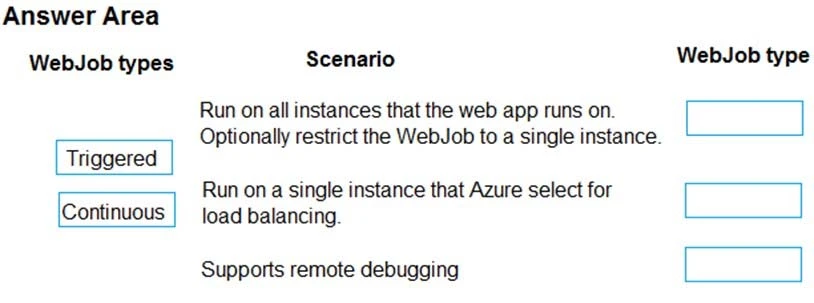
To ensure that both the application and related data are encrypted during and after deployment to Azure, follow these steps in sequence: Step 1: Encrypt the on-premises VHD by using BitLocker without a TPM. This ensures that the VHD is protected before it is uploaded to Azure. A TPM is not necessary because a virtual machine does not have a TPM. Step 2: Upload the VHD to Azure Storage. This step allows you to move the encrypted VHD to Azure. Step 3: Run the Azure PowerShell command Set-AzureRMVMOSDisk. This command attaches the encrypted VHD to an Azure VM. Step 4 involves using the Set-AzureRmVMDiskEncryptionExtension command, which is not applicable here because it is used to enable encryption on a running IaaS virtual machine in Azure and does not make sense in this context because the VM is already using an encrypted VHD attached in the previous step.
To create a Dockerfile for the ASP.NET Core application ContosoApp, you must follow these steps: 1. Begin with specifying the base image using the FROM command. This would be a suitable ASP.NET Core runtime image, for example, FROM mcr.microsoft.com/dotnet/aspnet:5.0. 2. Set the working directory within the container using the WORKDIR command, e.g., WORKDIR /app. 3. Copy the necessary files from your local machine to the container using the COPY command, e.g., COPY . /app. 4. To call the setupScript.ps1 during the build process, use the RUN command, e.g., RUN powershell ./setupScript.ps1. 5. Define the default command to run your application when the container starts using the CMD command, e.g., CMD ["dotnet", "ContosoApp.dll"]. These steps ensure the setup script is executed during the build and the application runs upon container start.

To create a script that will run a large workload on an Azure Batch pool, the commands should be arranged in the following order: 1. Create the pool - This step will initiate the pool where the tasks will run. Use a command similar to: az batch pool create --id mypool --vm-size Standard_A1 --target-dedicated 2 --image canonical:ubuntuserver:16.04-LTS --node-agent-sku-id "batch.node.ubuntu 16.04" 2. Create the job - This command will encapsulate the tasks that will be added. Use a command similar to: az batch job create --id myjob --pool-id mypool 3. For loop to iterate through the number of tasks - This loop will be used to create multiple tasks in the job. Use a command similar to: for i in {1..$numberOfJobs} do 4. Create tasks - Add tasks to the job. This step will create the necessary tasks and make use of the loop variable. Use a command similar to: az batch task create --job-id myjob --task-id task$i --command-line "/bin/bash -c 'printenv AZ_BATCH_TASK_WORKING_DIR'" This order ensures that the pool is created first, then the job, followed by a loop to create the required number of tasks. Each task in the loop is created with a unique task ID.


